
Throughout the year, the night sky cycles into some beautiful scenes. From Super Moons to eclipses, there are so many incredible images you can capture of our friendly neighborhood moon! If you’ve ever wondered how photographers capture those giant moon shots, here are all of your answers.
Moon photography relies on the right camera, lens, and proper astrophotography settings!
The Camera
The tool that leads the charge, let’s chat about the type of camera you’d want for giant moon photography. There are several key factors to look at when determining the camera worthy of your investment! These characteristics affect the final output of the image, the image quality, and your success as an astrophotographer.
Firstly, look for a camera that is capable in low light. The lower the ISO number, the less sensitive the camera is to light (but the less noise the photograph has). The higher the ISO number, the more sensitive the camera is to light (but the more noise the photograph has).
You need a camera that can go to a rather high ISO to account for the fact that you’re photographing in the dark, and one that has good noise reduction at high ISO levels. Each camera processes high ISO levels differently, some produce clean images and others are riddled with noise. Pick the one with the least amount of noise.
As well, for noise reduction, look for full frame cameras rather than crop sensor / APS-C cameras. The larger the sensor, the more light it can collect. The more light it can collect, the easier it is for you to photograph at night!
Next, consider the megapixel count. The larger the megapixel number, the more detail your camera can catch. If you love the shots with all the moon’s craters, this is a must-have. As well, large megapixel numbers allow you to crop your image significantly without losing much quality.
The Lens
First thing is first, for giant moon photography, you need a lens with a long focal length. For giant moon photographs, look for long focal lengths such as 200mm and longer! 70-200mm lenses and 200-400mm lenses are prized for this type of photography.
The focal length is just one component, the next one is the aperture (denoted by F/-insert number here- on a lens). The aperture is how wide the lens can open. Why this matters is that the width of the lens affects how much light gets let in. The aperture number mentioned on the lens is the widest the aperture can open. The smaller the number, the wider it opens. You can always narrow an aperture down by increasing the aperture number, but you cannot make an aperture wider than the number listed on your lens.
You’ll want to exclusively look for lenses with wide apertures due to moons happening, well, at night! F/2.8 is a great aperture for giant moon photography.
Also look for lenses that feature image stabilization systems. Also known as IS, image stabilization is a mechanical system inside of the lens that aims to, well, stabilize the lens from any unintentional movements. Whether it be a handshake or a gust of wind, IS systems will ensure that these don’t cause any motion blur in your photograph.
Night Photography Settings
As you may guess, moon photography happens at night. Although the camera can control much of the light intake through the ISO, if you’ve ever taken low light photographs, you know that the higher the ISO level the more noise or artifacts the photographs have. You want an image that is pretty noise free and clear to be able to see all of the gorgeous stars and planets!
What helps keep your ISO level at a decent level is the wide aperture of the lens. Use this aperture as a base-line for your exposure settings. F/2.8 is best, with wider even better.
The next priority is keeping your ISO as low as you can while still exposing for the lack of light. Depending on how far your camera can push the ISO before it gets too murky with noise, you’ll likely sit around the ISO 3200 – 12,000 depending on the ISO range your camera can handle.
In order to accommodate the ISO number and aperture, your shutter speed will be rather slow.
For White Balance, leave it on Auto because you’ll likely need to use post processing to bring true colors back to your shot anyways. Metering can either stay at Matrix / Evaluative or Shadow Priority, to help expose for the blacks in the image.
Use a Tripod and Keep Image Stabilization On
Even if your camera and/or lens have image stabilization systems in them, a tripod will still be your best bet. Tripods are three-legged stands for supporting and holding a camera. Many astrophotographers shoot at rather slow shutter speeds and as such, they want to eliminate camera shake caused by their hands in order to keep the photograph free of motion blur.
As well, keep image stabilization on, too!
To start, image stabilization is a mechanical system inside of a camera that aims to remedy camera shake. This technology is meant to prevent any bump, shake, or other physical movements from impairing in image. These systems can range from an internal gyroscope to a computer stabilizing the image.
In difficult outdoor conditions such as wind, tripods are not perfectly stable! As such, image stabilization can be very applicable to the minor shakes and movement caused by weather such as gusty wind.
You may also want to nab a remote trigger too. For the same reason as a tripod is used for slow shutter speeds, a remote trigger allows you to take a photograph without touching the camera (and as such, prevent camera shake!).
Location and Timing
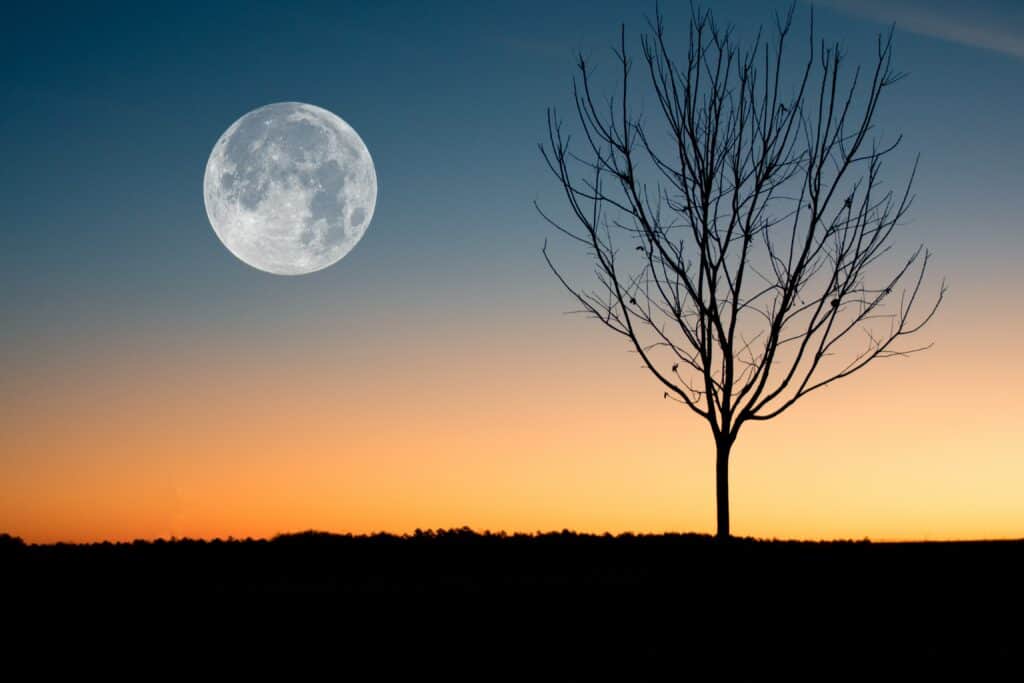
Now, the only other real secret to giant moon photography is location and timing!
For timing, use an astrophotography calculator or app to determine the correct time to be at a location. The best moment to shoot the supermoon is during moonrise and moonset, which always happens during the golden hour at sunset or sunrise. You can often include a zip code and the app will let you know exactly what time to be ready to shoot.
Next, look for a location that is eye catching or has various elements in it (such as trees and houses) that can cause the moon to appear even larger. The shooting spot determines the size of the moon relative to your subject, and this has nothing to do with your lens focal length. You’ll need to choose a shooting spot that is at the distance that gives you the desired size of the moon compared with your subject.