

Photography comprises several key settings that help you create the photograph of your dreams. These main settings are aperture, shutter speed, and ISO. Where the other two are a bit simpler to understand, ISO is a setting that confuses photographers worldwide. Here is a breakdown of what ISO is, why you should care about ISO, and how best to use ISO!
What is ISO?
ISO can be a bit tricky to define because it has different definitions between mediums. ISO began in film photography but changed its form when digital photography emerged.
In film, the ISO numbers explained the film emulsion type on a film roll. The numbers would range from 100, 200, and so forth to tell you what sensitivity that roll of film has to light. The lower numbers mean the film is not very sensitive to light, and the higher numbers mean it is more sensitive. Photographers would then select a roll based on how much light is available for their photo shoot.
Digital cameras don’t use film rolls, but the phrase “ISO” carried over anyways. Digital cameras have sensors in them that record light and images. The sensor has pixels in it, tiny little units that measure how much light hits them. When light hits the sensor, the voltage in each pixel is changed depending on the intensity of the light, and the camera records these voltage values.
What ISO values mean to this is that they specify something called gain. Gain tells you how much the image’s brightness increases after recording the pixel voltage. This is always recorded at a base ISO (usually a base ISO of 100). The ISO numbers beyond that tell you how much gain is added to the base ISO after the image is taken.
I know this can get a little confusing, so here is an example:
Say you set your ISO to 200. The image is still recorded originally at 100 ISO but is then brightened by a gain of two, as signified by the 200 ISO value!
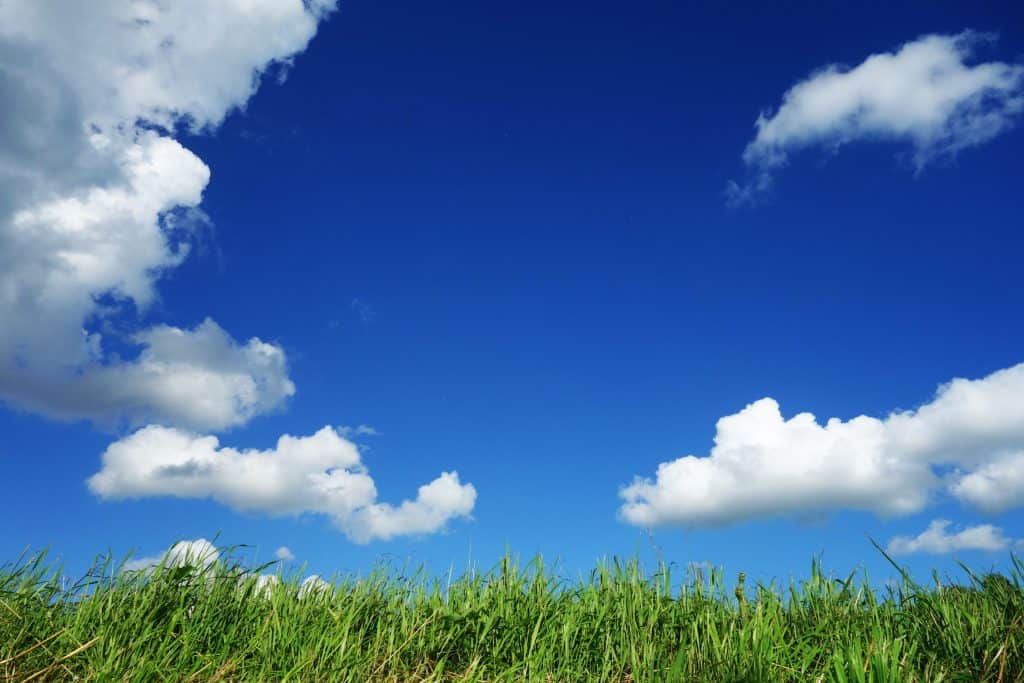
This is all the technical aspect of it. As a photographer, all you need to know is that the lower the ISO number, the less ‘sensitive’ the camera is to the light. This means that images will generally turn out a bit darker. The higher the ISO number, the more sensitive the camera is to light. Images will look brighter. You adjust this based on how much light you have to work with! On a bright sunny day, your ISO will be very low, probably 100 ISO. You will use a higher ISO value to brighten the room in a dimly lit room.
Bonus: ISO is an Acronym for What?
Plot twist, ISO is not an acronym!
Contrary to popular belief, it does not stand for “International Standards Organization.”
ISO comes from the Greek word ‘isos,’ which means equal. The various translations of “International Standards Organization” in each language would require different acronyms, which would get confusing. As such, ISO was the adopted phrase, as the ISO values do not change per country.
ISO and Exposure
Exposure is the amount of light that reaches your camera. Too much light and your image will be too bright, called overexposure. Too little, and it’ll be too dark, called underexposure.
Exposure is a formula, sometimes demonstrated as a triangle: ISO + shutter speed + aperture = exposure.
Like a mathematical formula, if one variable changes, the rest are affected by the change.
Here is their correlation, broken down in the simplest of explanations:
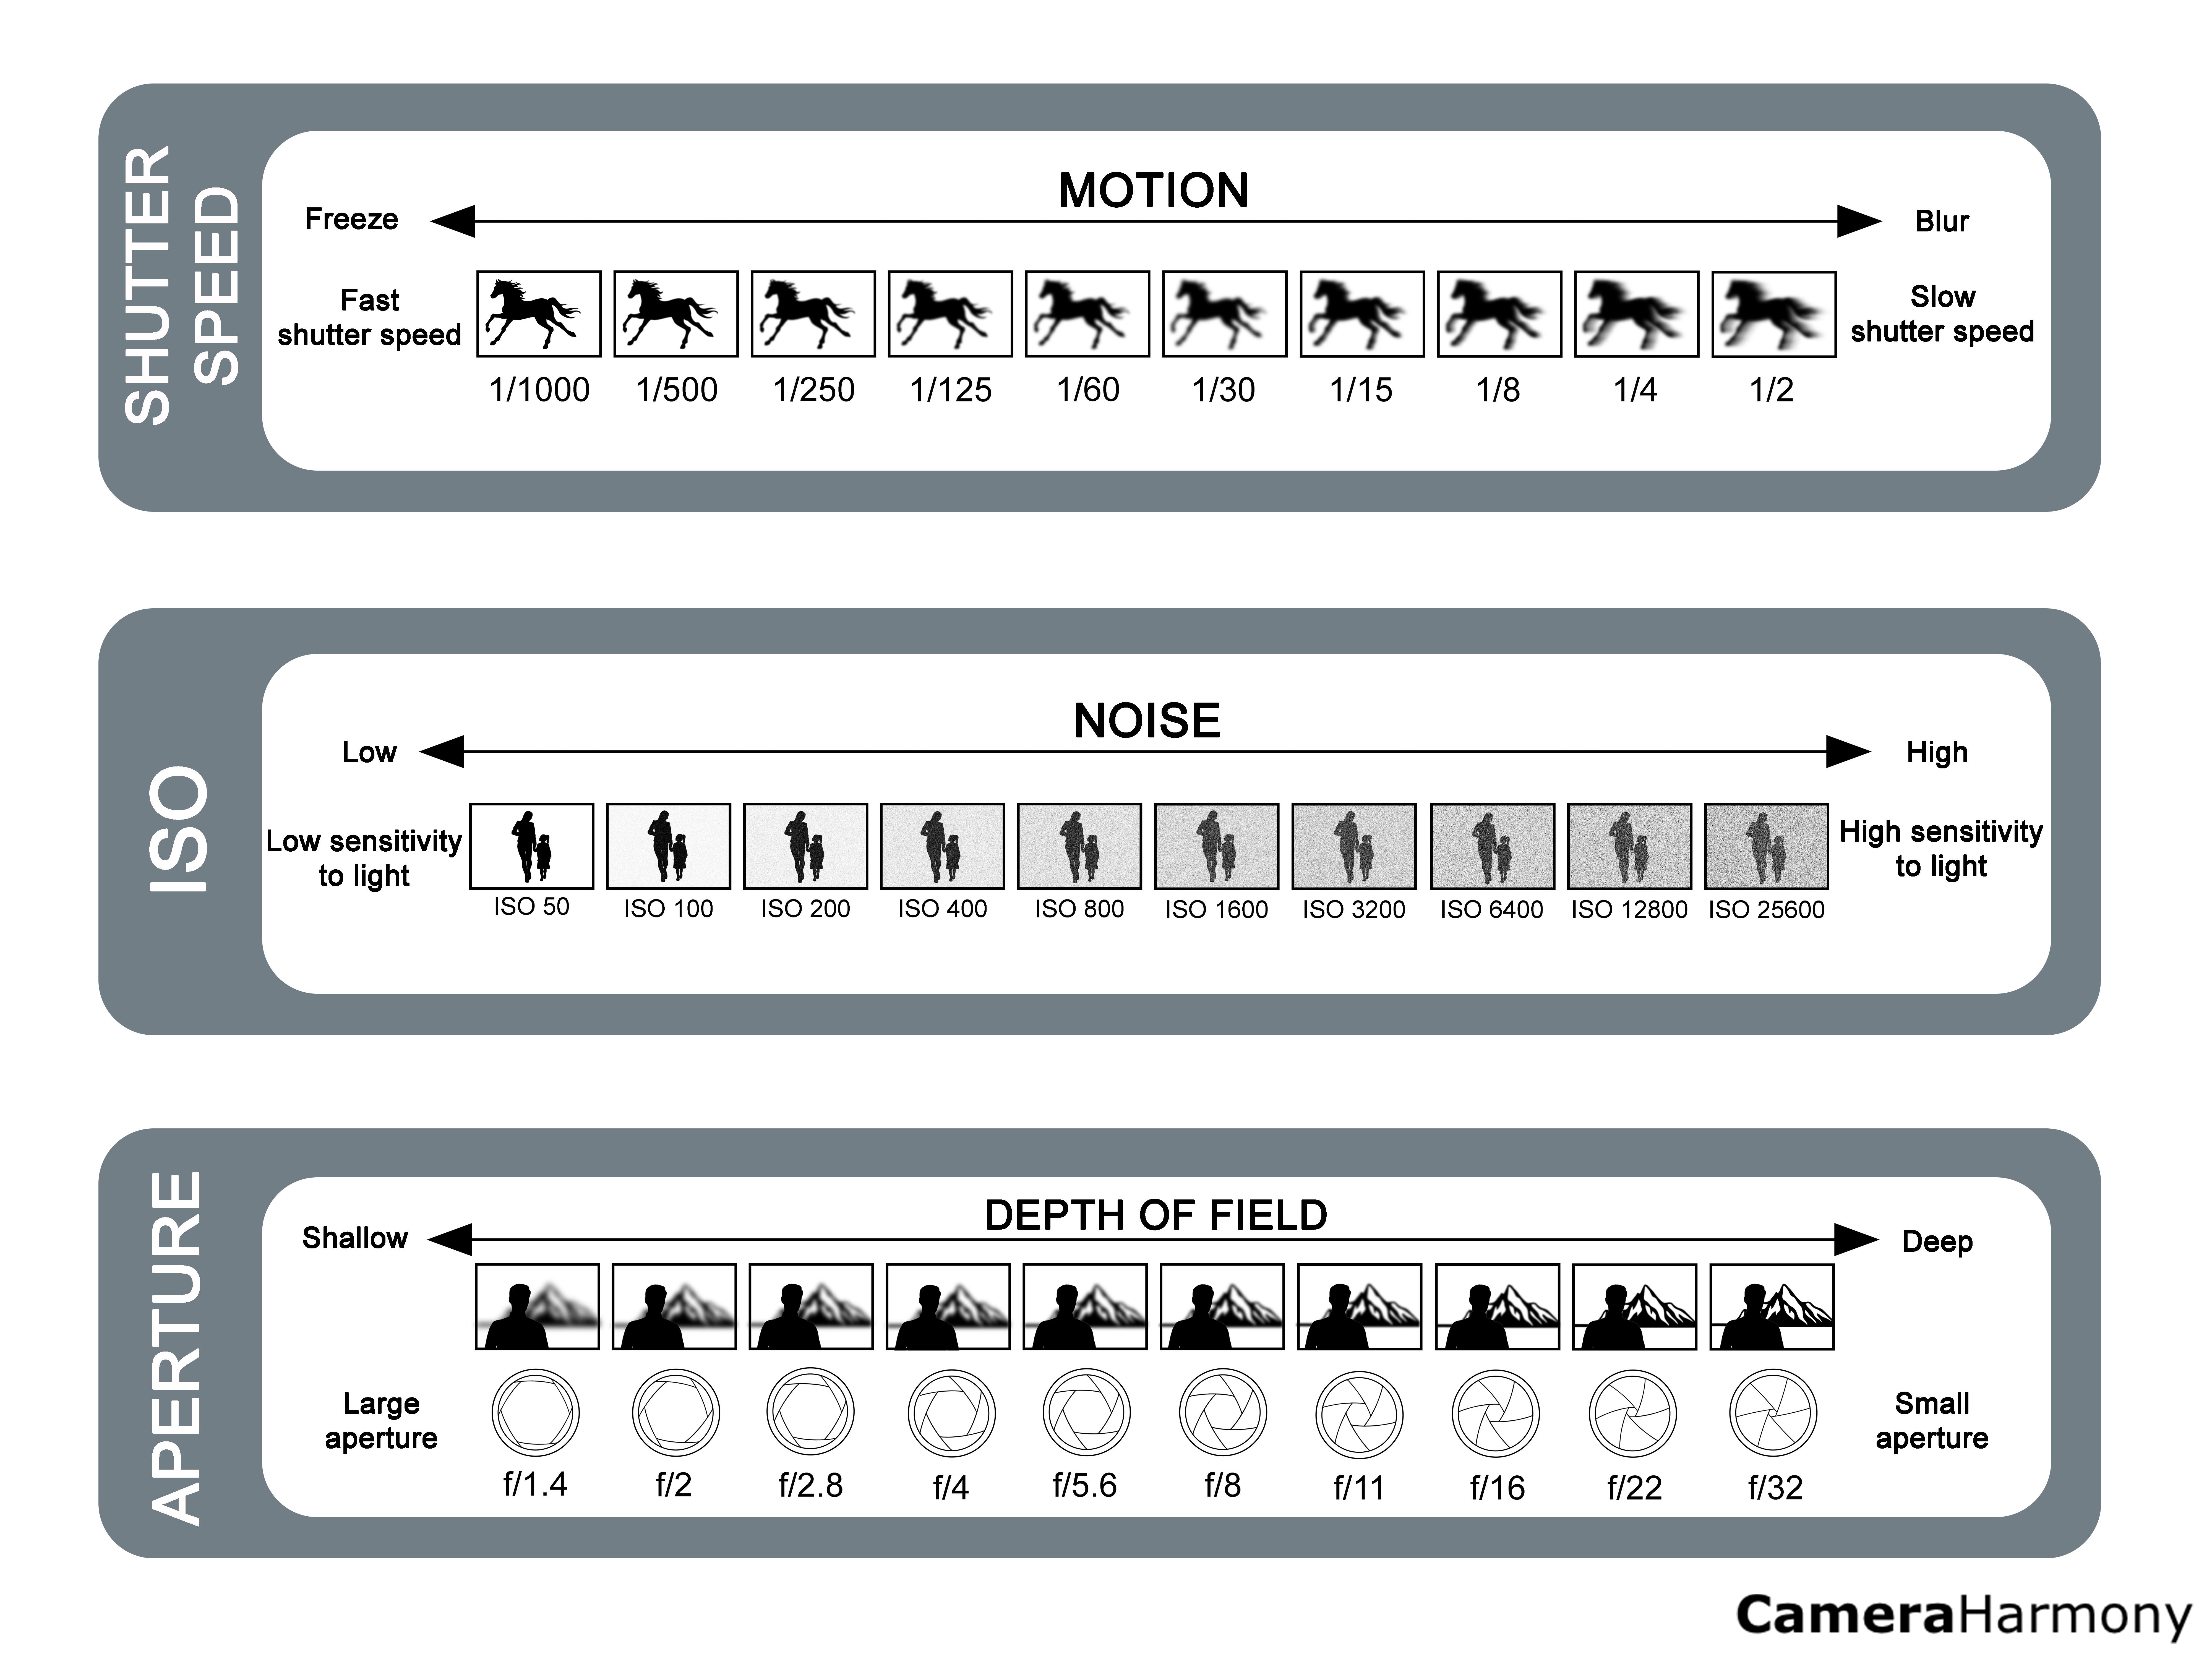
The shutter speed is how fast your camera takes a photograph. The higher the shutter speed number, the more frozen the action (but the photograph will be darker). The lower the shutter speed number, the more motion blur your photograph will have (but the photograph will be lighter).
Tip: Shutter speed is the numbers on your camera ranging from 1/-15 to 1/8000. 1/2000 – 1/4000 are the best to freeze action. 1/300 is excellent for portraits. Anything lower than 1/100 will begin to slow the camera down a lot.
The aperture controls how much light does (or doesn’t) hit your sensor. The lower the aperture number, the more light the camera lets in. The higher the aperture number, the less light the camera lets in. The lower the aperture number, the shallower the depth of field. The larger the aperture number, the deeper the depth of field.
Now, back to the ISO. The lower the ISO number, the less sensitive the camera is to light (but the less noise the photograph has). The higher the ISO number, the more sensitive the camera is to light (but the more noise the photograph has).
Be careful of overexposing your photograph, which causes your image to lose detail. Underexposing can be more easily recovered than overexposing, but then you’ll have a lot of noise or wonky colors. Best to try and create the most even exposure!
What ISO Should You Use and When?
What ISO setting you should use depends entirely upon the available light at your photo session and what you are trying to accomplish.
Generally, cameras have ISO settings that range from ISO 50 (low sensitivity) to ISO 12,800 (high sensitivity). Ideally, you never want to reach 12,800 because your image will be very noisy. You want to stay as low as you can afford to!
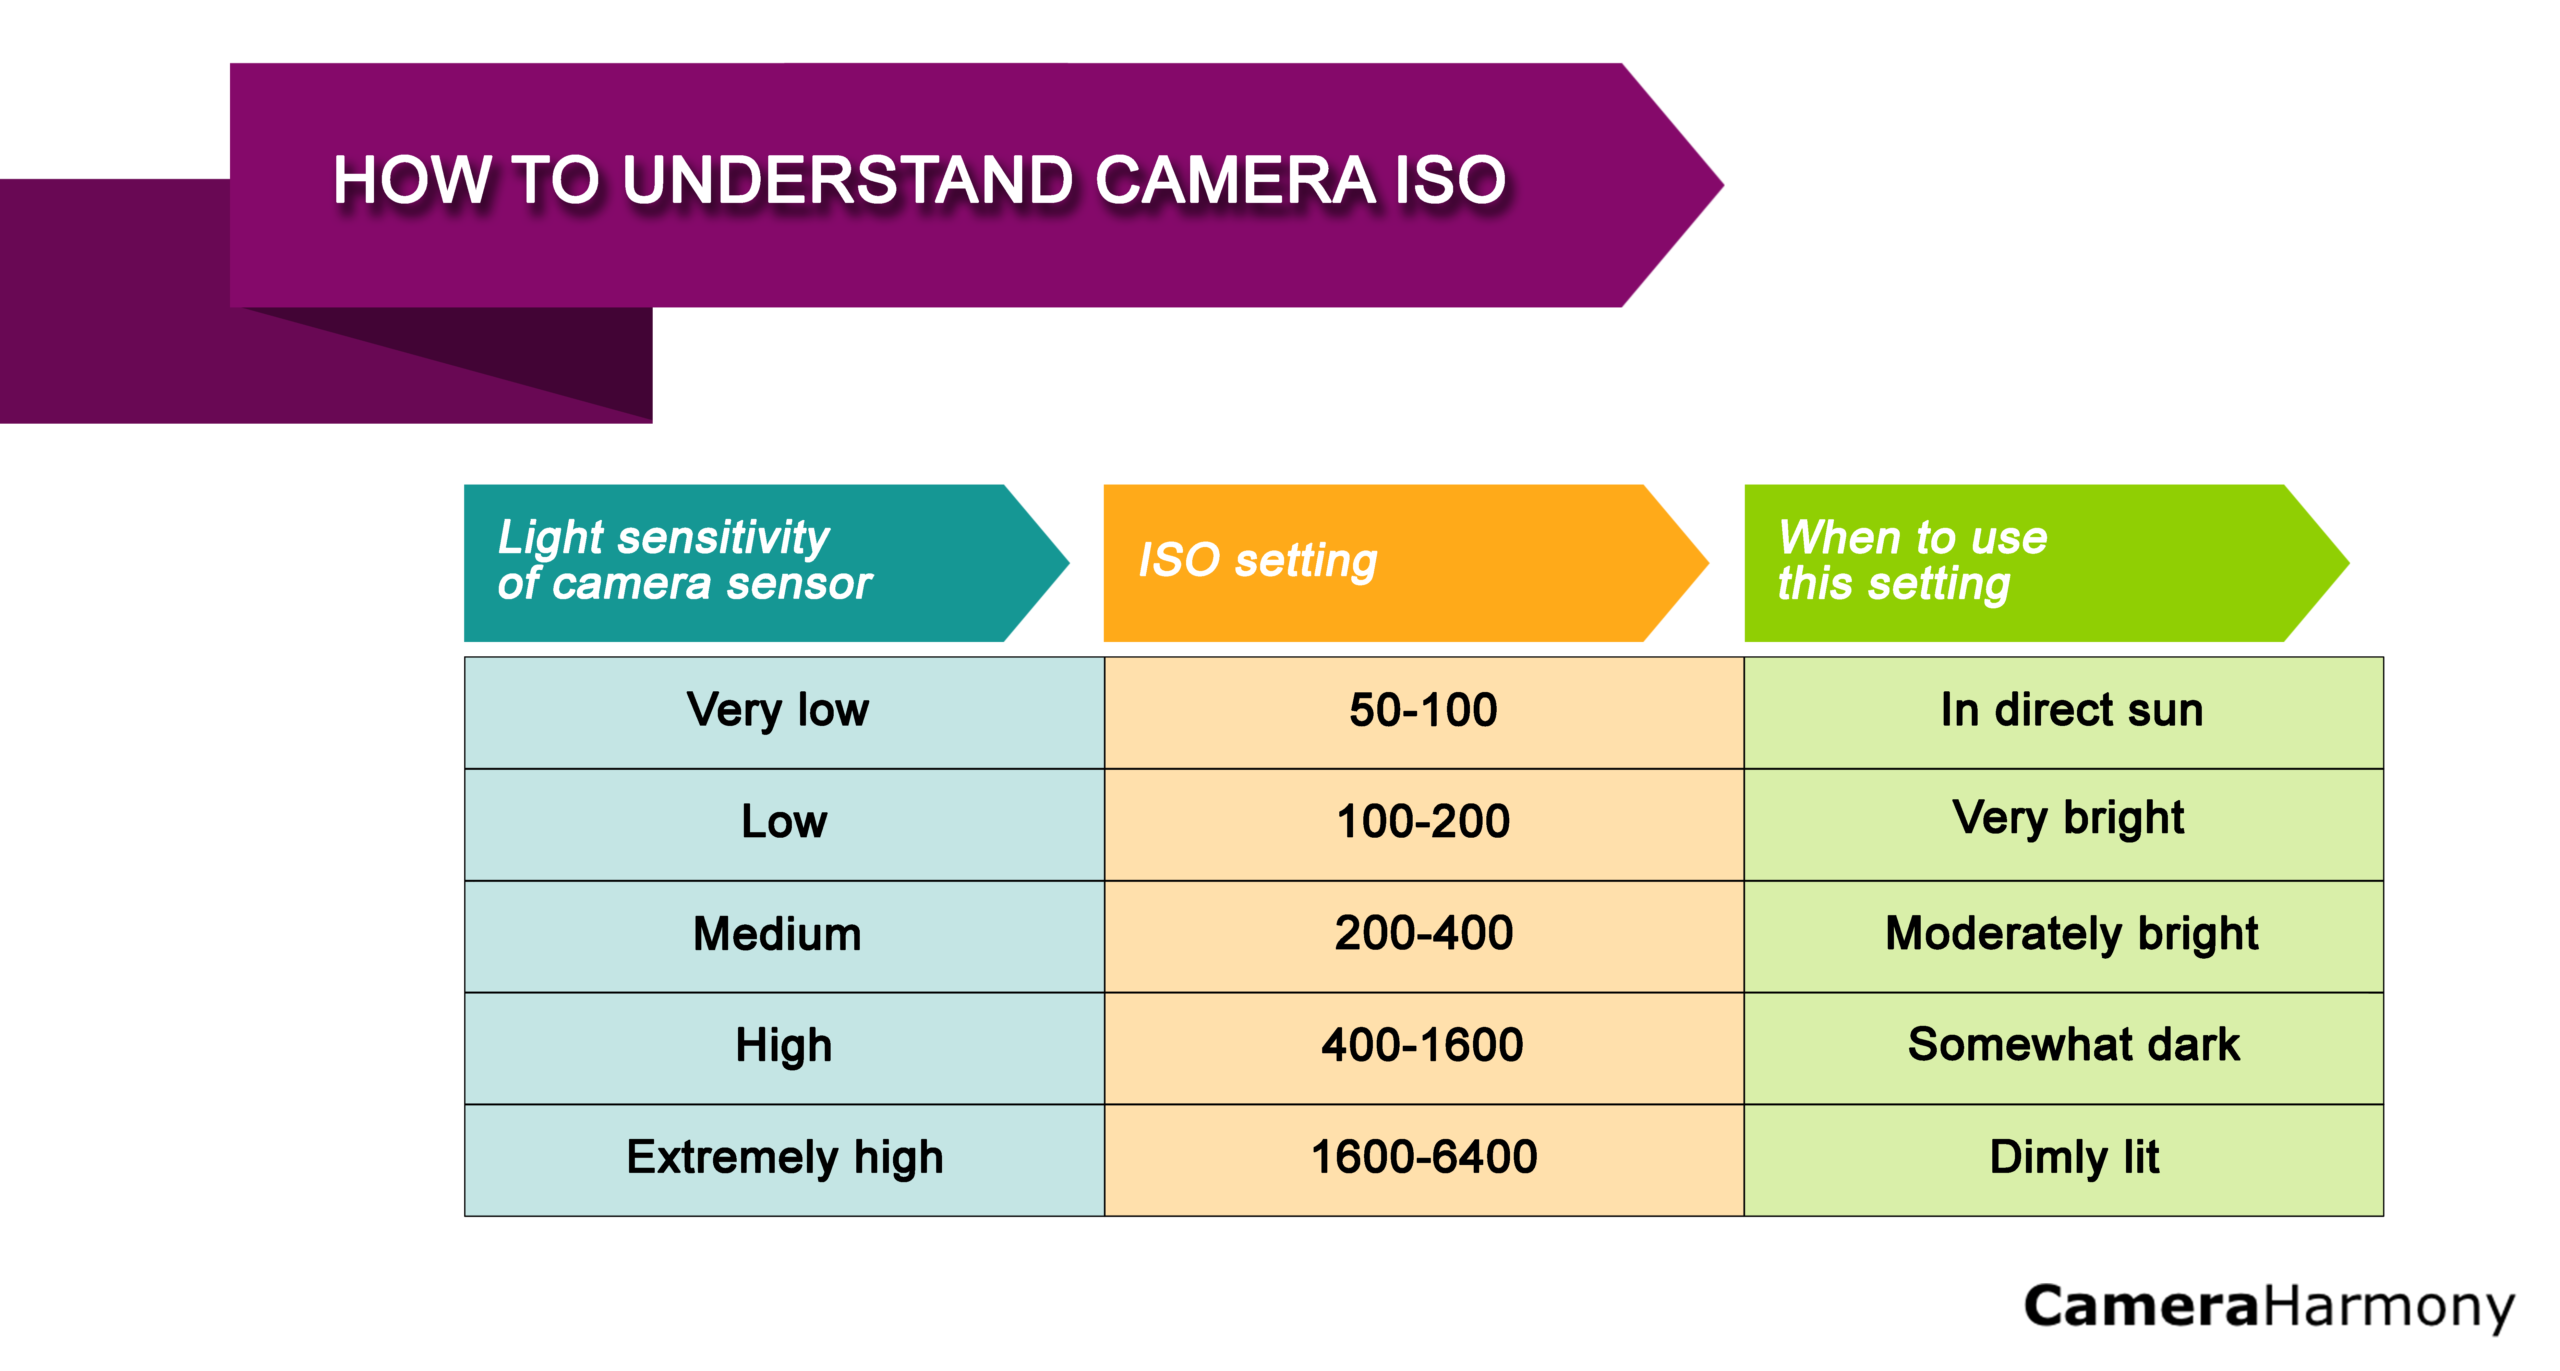
A simple breakdown of what ISO value to select when is as follows:
ISO 50 to 200: Bright, sunny days. You will linger around 50 to 100 when the sun is very high up in the sky (like noon lighting) and maybe increase to 200 when the sun is a bit lower. You’ll also use these ISO values if you’re shooting in a photo studio with strobes, flashes, or other artificial light.
ISO 300 to 400. Excellent for shooting outdoors in the shadow, when it’s overcast, or when the sun is getting much lower down.
ISO 500 to 800. This is great for when it gets dim but not yet completely dark. A good setting for sunset or sunrise too!
ISO 1600 and more. This will be used primarily in low-light situations, such as shooting indoors. If you capture the action in a place with little light, you will also increase your ISO because making your shutter speed faster will darken your image!
ISO and Noise
There is a downside. With film, the more sensitive the roll is to light, the more grain the photograph has. Grain is crystal emulsions on film rolls. The larger the grain, the more light can be exposed. But the more extensive the grain, the more you can see it. This comes out as specks in a photograph. The less sensitive the roll is to light, the lighter the grains and the less you see them.
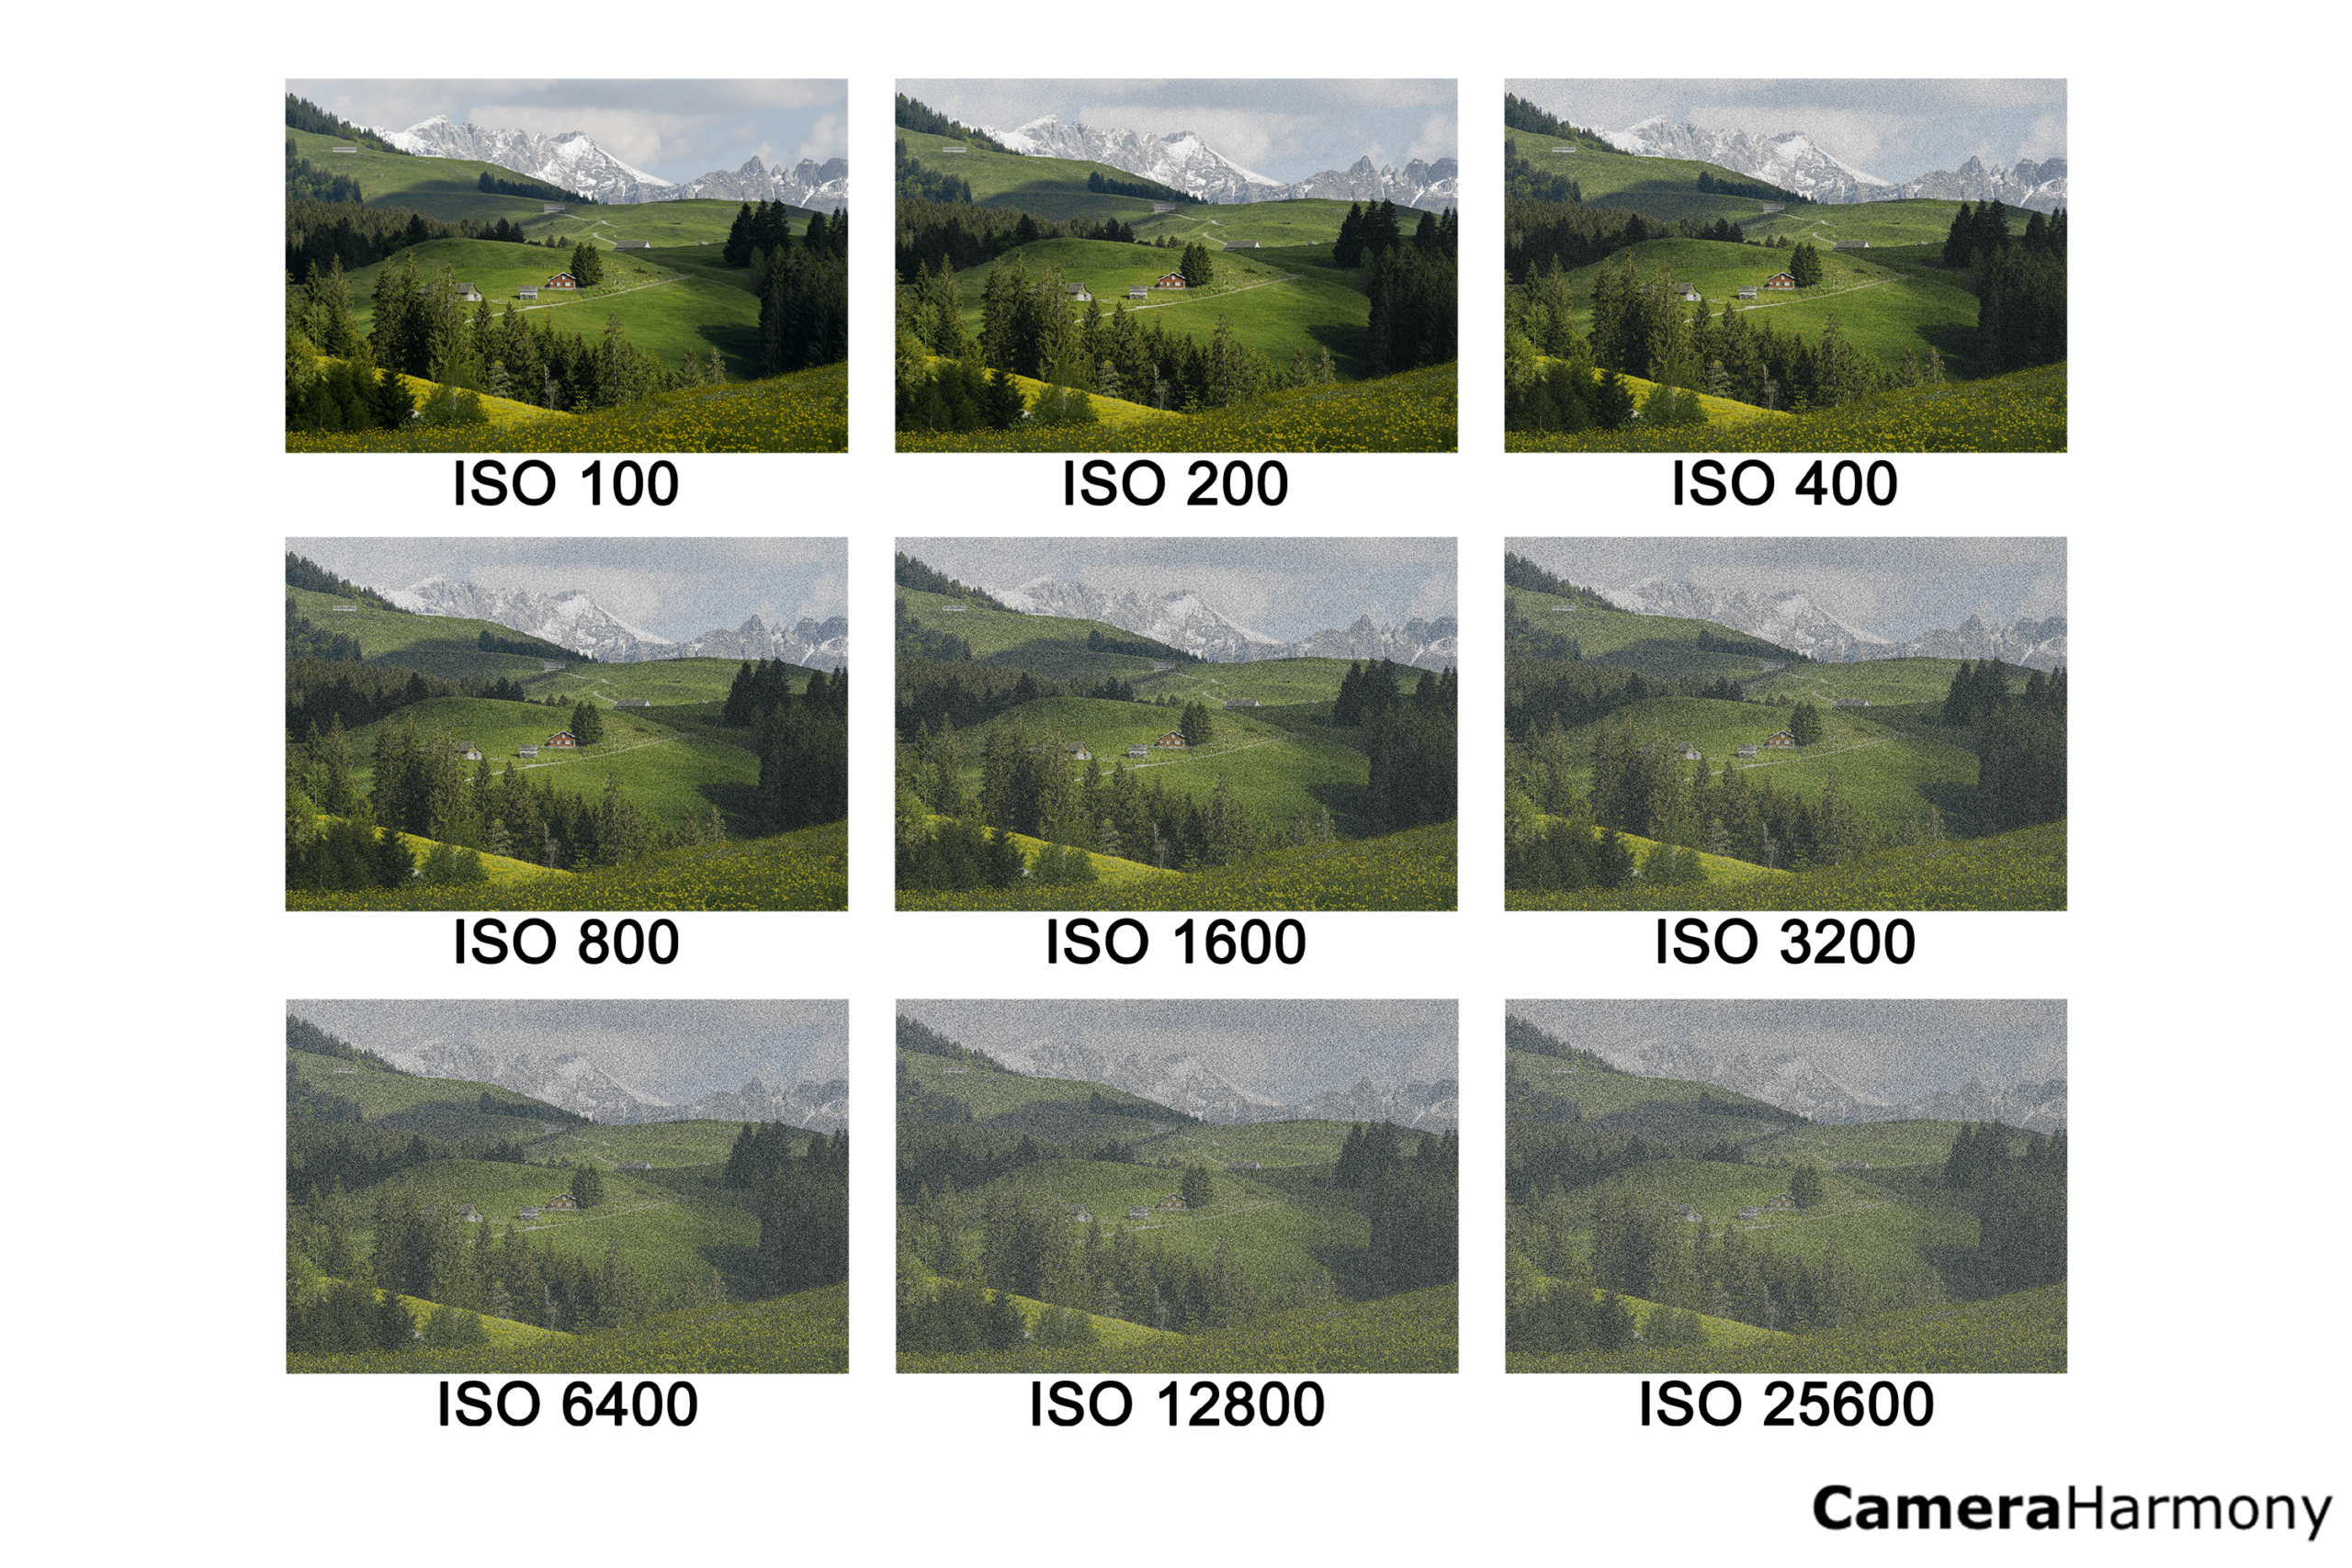
Digital ISO has a similar problem in the form of noise. Noise is like grain, and you see specks that shouldn’t be there in your image. The higher the ISO number, the more noise your image will have. Keep this in mind when picking your ISO level and, even more importantly, when choosing a camera to buy.
How Does ISO Factor Into Camera Decisions?
How well a camera performs at higher ISO levels factors into its cost! As you can imagine, better performance equals a more significant price tag.
Suppose you capture images in difficult lighting situations or low light (such as nightclubs and concerts) or want to push ISO higher. In that case, investing in a camera that has less noise and artifacts at higher numbers is a must-have.
Suppose you’re a studio photographer that uses strobes or a natural light photographer that captures during the daytime. In that case, ISO sensitivity becomes less critical, and you can save your dollars!
You can see how cameras at different ISO levels compare by looking at the sample images provided by the camera brand.
How Much Noise ISO Can You Remove in Editing?

You’ll still have to use higher ISO levels and contend with noise in many situations. Fear not; there is a solution to this problem! In post-processing programs such as Adobe Lightroom and Adobe Photoshop (as well as some freeware solutions), you can artificially remove noise and smooth out an image.
There is a limit to how much you can remove before your photograph begins to fall apart. You can tell your photograph reduces the quality when the image becomes murky, too smooth, or the detail is all gone. Generally, you can safely remove the noise that appears on most cameras up to an ISO of 3200. Beyond that, it may be a bit tougher.
When removing noise via a program, consider the photograph’s final use. Is the photograph going only to be shown online, via social media, or a portfolio-sharing website? Is the photograph going to be printed? Will it be printed large?
If sharing online exclusively, there is a lot more forgiveness in your editing. You can smooth an image out entirely, and the compression that popular websites such as Facebook and Instagram apply to the image will hide the fact that it is a bit softer than it was before.
Compression happens when an image is resized or ‘scrunched’ (like a hair scrunchy) to fit the dimensions required by the website. When an image is made smaller, it automatically looks sharper and hides many discrepancies.
If an image is being printed, there is less room for error. Prints tend to show many details, especially when details are missing! However, if you print on a matte or textured canvas, the texture of the paper can hide some noise problems.
Conclusion
ISO is a setting that controls how your camera sensor reacts to the light available. ISO helps you lighten images taken in dark places or darken images taken in bright sunlight. When appropriately combined with aperture and shutter speed, ISO helps expose the image just as you want!