
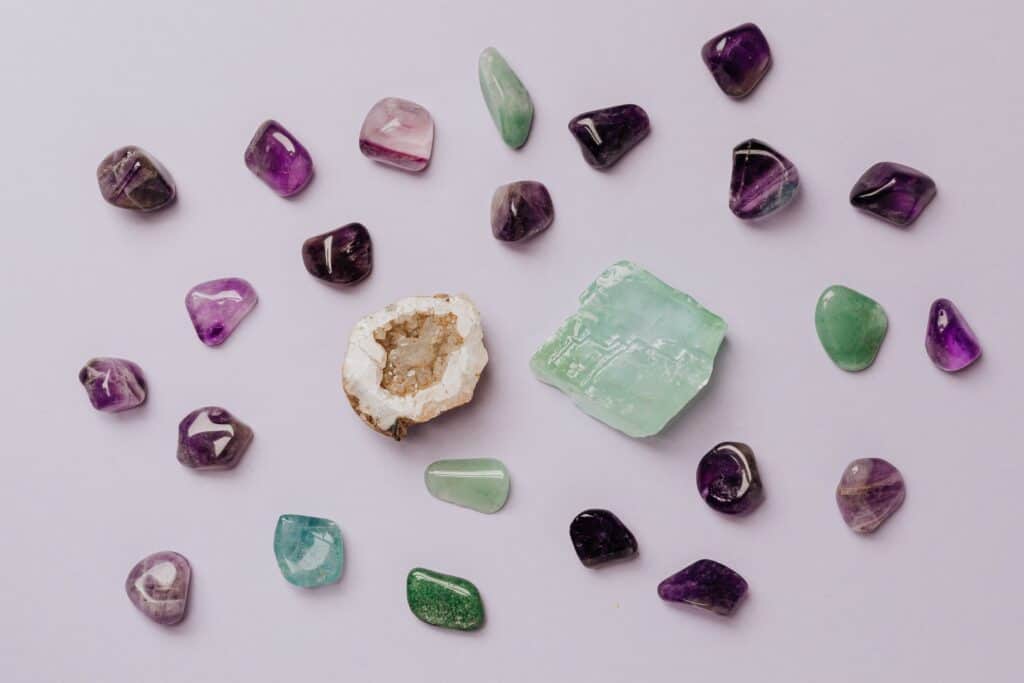
You don’t need to be involved in the mineralogical or museum field to find agates something worthy of collecting, let alone photographing! Agates can strike the eye with their beautiful colors, patterns, and details, and as such, capturing that beauty on camera is the best way to share it with the world.
That being said, capturing agates is no simple task due to their reflective nature making lighting more complicated and wanting to ensure that the colors are true to life. Here is our best advice to truly capture the beauty of the agate on camera.
What is an Agate?
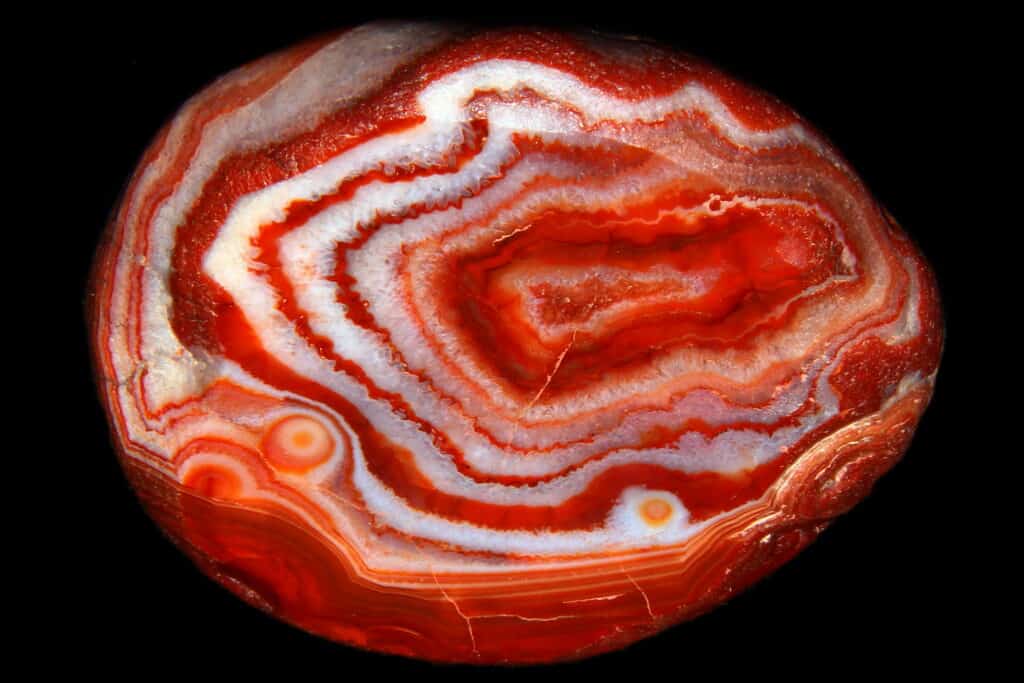
Just to get this question out of the way, the agate is a common rock formation made up of components of chalcedony and quartz. Agates are primarily formed within volcanic and metamorphic rocks, and as such, come in a variety of colors and patterns. Although the agate may look like nothing on the outside, on the inside, they are striped, banded, or patterned in a beautiful way.
Macro Lenses
With the detail of agates (and oftentimes their small size), ideally a macro lens would be best for this type of photography. Macro is a unique type of photography in which small objects are photographed so close up that they are made to look life-sized or larger than they are in a photograph. The term “Macro” itself means “large scale”.
Macro lenses magnify whatever they capture, more so than that of any other type of lens which solely does close-up photography. Macro photography features a more significant degree of magnification and a lot more fine detail. Macro photography can even make the most miniscule details seen.
Good macro lenses let you shoot at 1:1 magnification, and some can even shoot up to a ratio of 5:1, (which is 5 times magnification!). Magnification in photography is a ratio. For reference, 1:1 is considered to be at “life size” magnification. Half size ratio is 1:2.
Best Camera Settings for Agates
Agates are still life, so luckily you don’t need to worry about the stones sprouting legs and running off. As such, you are much more lenient on your camera settings. The sole focus is capturing the proper exposure.
Exposure refers to how light, dark, or just right your image is. Exposure consists of three variables that work in tandem together to dictate the type of light you capture: shutter speed, ISO, and aperture. Like a mathematical equation, if one variable is altered, the rest are affected.
The best way to fill in the equation is to prioritize one of the variables and use it as a baseline. In the case of agates, the priority should be aperture.
The aperture controls how much light does (or doesn’t) hit your sensor. But equally there, the aperture also controls the depth of field (which refers to how much of an image is in focus). The lower the aperture number, the shallower the depth of field. The larger the aperture number, the deeper the depth of field. For agates, you want a fairly deep depth of field to ensure that every detail is perfectly visible.
As such, setting the aperture to something like F/9 and narrower is best!
That being said, the lower the aperture number, the more light the camera lets in. The higher the aperture number, the less light the camera lets in. In the case of F/9 or higher, the image will become darker than normal. That is where you now adjust ISO and shutter speed.
The ISO is your camera’s sensitivity to light. The lower the ISO number, the less sensitive the camera is to light (but the less noise the photograph has). The higher the ISO number, the more sensitive the camera is to light (but the more noise the photograph has). You want to keep the image as clear of noise as possible to ensure it doesn’t alter the color of your agate or add a texture that is not actually there. It is suggested that the next setting you adjust is the ISO, keep it as low as you can, such as ISO 100 or ISO 200!
Next, because you are capturing still life, you can afford to have a slower shutter speed. This is especially able if you place the camera on a tripod and keep it stable. The shutter speed is how fast your camera takes the photograph. The lower the shutter, the brighter the image.
In regard to the other settings, such as metering and focus mode, you can leave that on the default (One Shot focus mode and Matrix / Evaluative Metering).
See how this all correlates? Those are your settings for agates.
How to Ensure Your Colors are True To Life
A big point of contention for agate photography (prevalent in all mineral and crystal photography) is making sure that the colors are proper. You can do this by adjusting your white balance.
To explain what white balance is, we must first define the term Color Temperature. Color Temperature determines if colors are cold, warm, or neutral depending on the amount of light present. As you can imagine, this affects the authenticity of the colors themselves.
In layman terms, white balance adjusts colors so that they look more natural, or accurate to the scene. White balance gets rid of something known as a Color Cast. Color Casts are visible tints in an image.
Your camera will have some white balance options preset. Select the one that brings more realistic colors out in your photography. If none of the presets are working for your present situation, you can always make a custom white balance!
Lighting for Agate Photography
The primary point of the agate-photography-equation is the lighting. If you live in an area in which your outdoor world is commonly overcast or the lighting is even, capturing the agate outside in natural light is wonderful! However, if you do not live in a place like this, you’ll want to consider artificial lighting, or studio lighting.
The first thing you’ll need is a softbox diffuser with either a continuous light or a flash. A diffuser softens the light that hits it or goes through it. All diffusers create a larger light source, spreading the light out over a larger area. This softens the light, otherwise known as, makes sure the light doesn’t have a hard edge to it (like a spot light might have). The diffuser is important because it ensures that the light is very even and beautiful on the agate.
Next, arrange your light source above your agate and let the light fall down. This can be done with one light. If you are looking to get extra fancy, you can use three lights. For separation between the subject and the background, you can do the triangle arrangement with three umbrellas. Place one light in front of your subject, and two lights behind the subject on either side. Aim all of the lights towards the subject.
Now, in all of this, ensure that none of these lights end up as a reflection on the inside of your agate. Play with vantage point to alleviate reflections or lighting placement!
Tip: Be Mindful of Imperfections when Lighting
Agates are not perfect, but we want to showcase them to be as perfect as possible. Be attentive to your lighting to ensure shadows don’t creep into imperfections, or that imperfects are not highlighted in your arrangement. Play around with moving lights to hide problem areas.
The Background for Agate Photography
Next, you’ll want to capture agates on a surface that is not distracting and will not bounce light around in a way that would be detrimental.
Look for totally plain set ups or even still life boxes to use! If you are seeking a solid surface, look for one that is a neutral color that will not distract from the beauty of the agate itself.
Surfaces that are matte texture do best as they won’t bounce your artificial light around in ways that you can’t control.
In conclusion, the above tricks should aid you in showing off your agate collection to the world (or maybe even landing a position photographing these beautiful minerals for a museum!).