
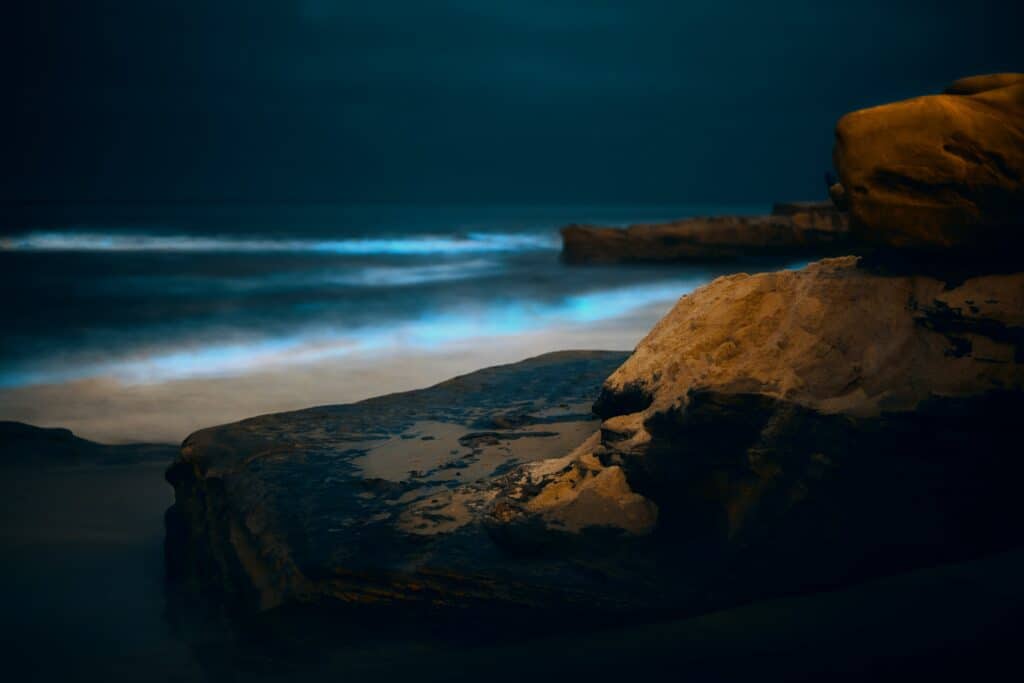
You’re walking along the coast of the ocean on a dark evening- and suddenly you see a blue glow emitting from the water itself. You quickly grab the camera and try to take a photograph, only to realize that normal settings don’t tend to work in capturing such a unique situation.
You’ve witnessed bioluminescence, a natural phenomenon that happens in the water. As lovely as this looks to the human eye, camera sensors have a much harder time understanding what you are seeing. Here is our guide to capturing bioluminescence in all of its vibrant glory.
What is Bioluminescence?
Bioluminescence refers to the release of light from a living organism. If you’ve gone to an aquarium and seen jellyfish, you’ve seen bioluminescence. Bioluminescence is most common among fish, squid, jellyfish, siphonophores, comb jellies, and other animals that are mostly made of water.
When speaking about bioluminescence, the color blue comes to mind as it is the most common. This is the light that travels best through the water. However, bioluminescence can range from nearly violet to green-yellow (and very occasionally red). All bioluminescent organisms use a reaction between an enzyme and a substrate to make light, but different species use different chemicals in the process. This is where photographing bioluminescence can be a bit tricky.
Bioluminescence is found primarily in the ocean, and although you typically don’t see it on the surface, sometimes bioluminescent plankton float to the top which causes the water to glow. This is typically what people refer to when asking how to capture bioluminescence. If you hang out at the beach at the right time of year, you’ll see a tremendous amount of this, especially along the coast of California, Oregon, and Washington in the United States. For those not in the states, bioluminescent occurs more frequently in the Maldives, Thailand, Vietnam and Australia.
The Difficulties
The first difficulty is finding bioluminescence in the first place! Use local guides and research the best time of year in order to find this legendary ‘sea sparkle’ as locals sometimes call it.
Now, just because our human eye can see bioluminescence does not mean the camera’s sensor is able to as well. You have to remember that a camera is not equivalent to our eye, as much as it may seem like it at times.
The next problem being that bioluminescence is only really seen at night. Therefore, you are now dealing with a low light situation and cameras are never fans of limited light. You run the risk of motion blue and noise running through your shot.
The Solutions
The solution to finding this phenomena in the first place is to do your research and find locations such as small bays, coves and harbours where bioluminescence has been seen before. Bioluminescence tends to occur in the warmer months, due to water temperature and the tide itself. Make sure to also research the tide so you don’t step too close. For bioluminescence to happen, the plankton needs to be moved or disturbed by something, so as the surf crashes onto the shoreline, the waves will ripple in blue light.
Next is helping the camera see. To start, invest in a low light capable camera. You want to look for a camera that has a good size sensor, great autofocus, and low noise in high ISO levels. For low light mavens, the sensor makes a huge difference. The larger the sensor, the more light it can collect. The more light it can collect, the easier it is for you to photograph at night clearly because you can keep your ISO number lower.
The camera’s eye is the lens, another part of the equation. When choosing a good lens for low light, pay very close attention to the aperture. The aperture will make the biggest difference. Fixed lenses are the only lenses that can open to an extremely wide aperture. As well as that, fixed lenses tend to be significantly sharper and clearer than variable focal length lenses because fixed lenses are perfectly constructed for the focal length that they are. Image stabilization is also a really helpful feature for low light work, as is a good focal length! Focal length for bioluminescence tends to be a wide angle, like a 35mm, in order to capture all of the magnificence.
How To (Step By Step)
Here is a quick how-to on capturing this beautiful series of events.
Step 1: Locate the Bioluminescence
First thing is first, find the bioluminescence! If you walk along the day time and see some red algae, plankton, or seaweed floating about- it’s a sign that coming back at night may yield some pleasant results.
Step 2: Compose the Shot
Once you find the blue glow, compose the shot. Composition can be pleasing or it can be poor. Pleasing composition is easy on the eye and attracts people to look at your photograph. Poor or bad composition looks awkward, doesn’t attract viewers, and tends to shy people away from an otherwise good photograph.
When composing the shot, look to see how the bioluminescence creates leading lines in the frame. Leading lines take the audience on a journey throughout the photograph, you want this to be a pleasant ride.
Step 3: Adjust Your Settings
The first and foremost best way to let whatever light is present to hit your sensor is via a wide aperture. For bioluminescence, you want a lens with a maximum aperture number of F/2.8, but ideally an F/1.8 or lower number. Set this right off the bat before adjusting anything else.
Use this aperture as a base-line for your exposure settings.
The next priority is keeping your ISO as low as you can while still exposing for the blue light. Depending on how far your camera can push the ISO before it gets too murky with noise, you’ll likely sit around the ISO 3200 – 12,000 depending on the ISO range your camera can handle.
In order to accommodate the ISO number and aperture, your shutter speed will be rather slow. How slow depends on what kind of shot you want to take.
If you want to capture bioluminescence as a long exposure, you’ll have your shutter speed of 10 seconds or more. Long exposures are when the shutter is open for a long period of time. This is used to blur movement or obscure elements and create a more artistic-looking image. If you’ve ever seen a photograph of a waterfall with water that looks silky smooth, those are achieved with long exposures and the same can be made of the bioluminescent water (it will look silky and smooth).
Because of the slow shutter, you’ll need your camera stabilized on something. Tripods are three-legged stands for supporting and holding a camera. They naturally stabilize a camera because it’s on an inanimate object! You can use a remote to operate the camera for even more stability.
If you want the bioluminescence to stand out as individual little creatures rather than all one silky wave, your shutter will need to be faster. Set it to 1/60 instead!
Step 4: Take the Shot
Go ahead and click on your shutter!
Make sure to shoot in RAW format due to the difficult lighting conditions- RAW is a file format that is famous for recording completely uncompressed images. When a photograph gets recorded as a file format, it becomes compressed to fit within that format and you may lose some quality or some forms of editing capability. RAW contains the direct image data from the camera sensors which stores the fullest details of an image.
The lack of file alteration allows significantly more control over large editing adjustments such as overblown highlights or an underexposed image. This is because you’re able to, in most situations, recover information in the image that would otherwise be lost if it is compressed.
In conclusion, bioluminescence is a beautiful natural phenomenon worthy of being a photography subject. This guide should aid you in capturing this magnificent natural wonder in all of its grand beauty!