
The camera can handle a lot- from frozen tundras to the hottest of deserts. Did you know that the camera can handle capturing exciting explosions too?! The speed and durability of our gear has improved tremendously over the last decade, able to capture the fastest of actions and withstand some debris and residue along the way!
In order to capture explosions well, you’ll have to master the art of fast shutter speeds! Pair that with burst mode, and you have a recipe for extraordinary captures. Here is our guide to explosion photography, as well as the various types of explosions you can conduct!
The Camera
The photography equation always starts with the gear that you use. The body of the camera contains all of the controls necessary to record digital pictures. The camera is basically a container to house the sensor and the lens along with the electronics and controls.
For explosion photography, you need the fastest camera you can find. Every camera has something called FPS, or Frames-Per-Second. What this discloses is how many pictures a camera can snap per second of shooting. Since explosions happen so quickly, often faster than the human eye can really comprehend, you need a camera that has a lot of FPS and is able to capture every single moment of the boom.
Ideally, you’ll also want a full frame camera rather than a crop sensor for explosion photography. To make it simple, a sensor in a camera collects light information and renders an image on to your screen. Sensors can be weak or powerful and different sizes. Crop sensors are weaker and will, as the name implies, crop the images you see in the viewfinder. The edges will be missing in the final image. With full frame sensors, what you see is exactly what you get, and they are much higher quality! With explosions, because you don’t tend to know how far the explosion will spread or range, a full frame sensor will make your life a thousand times easier.
Sensors tend to go hand in hand with another technical term called megapixels. Megapixels dictate how much detail your sensor can capture. The larger the megapixel number, the more detail your camera can catch. Only full frame sensor cameras have large megapixel counts.
Megapixels aren’t a gimmick to increase the price of a camera. Alongside prints, the megapixels do impact the details and quality of an image. As you may deduce, the more pixels, the higher quality the image because there will be more details. For explosions, the beauty of this type of photography is the amount of detail you can capture that the human eye cannot see normally!
The Lens
The next step is the lens- lenses gather and focus light. Light strikes the front surface of the lens and passes through the glass element. As a result, the final image result is due to the lens.
With explosion photography, whatever your aesthetic dictates works for it! You can use lenses that zoom or have longer focal lengths for more dangerous explosions, as this allows you to keep your distance. If you’re doing safer and more contained explosions, standard lenses work great as you can be a little bit closer. When it concerns what lens to invest in, having at least one fixed lens with a wide aperture can be pretty vital to have and at least one zoom lens with a long range that gives you flexibility.
The aperture doesn’t matter as much in explosion photography as it would in others as you’re going to likely be narrowing your aperture anyways in order to capture all of the details! More on this below.
Burst Mode
A big secret to explosion photography is a nifty feature called Burst Mode (sometimes referred to as High Speed Continuous Shooting, depending on camera brand. All brands have it, but the title may be different due to copyright reasons).
Burst mode is what activates your camera’s maximum Frames Per Second. In burst mode, your camera will then fire off as many photographs as it is capable of taking per second so long as your finger is held down on the shutter button. This is instrumental in capturing amazing action photographs, and you cannot do it well without!
That being said, in order for this to work, you have to have a shutter speed conducive to this use. Which leads us to this point…
Shutter Speeds
Shutter speed is how fast your camera can take a picture. In your settings or on the camera screen, this is denoted by 1/-insert number here-. This simply refers to how long the shutter in your camera is open. The larger the number after the 1/—, such as 1/1000, the faster the shutter moves.
In order to capture explosions, you have to set your shutter speed for action photography. Fast shutters capture photographs more quickly than slow shutters. For most types of action, your shutter must be above 1/500 minimum, but due to the fast nature of explosions, a minimum of 2000 is required. 8000, the max speed, is highly encouraged.
Now, shutter speed is just one variable in the exposure equation, which is shutter speed + ISO + aperture = exposure. When the shutter speed is set, the other variables must also change to accomodate.
This is because the faster the shutter speed is, the darker the image will look because light has a lot less time to hit the sensor. As such, your ISO will need to be bumped up and your aperture will need to be widened as well to let in more light. If you’re capturing explosions in a studio, you’ll need to use very bright artificial lights to make up for how dark your shutter will cause the exposure to be.
The most common artificial lights for explosion photography include extremely bright halogen continuous lights or strobes and flashes. If using strobes and flashes, you’ll need a model that has a feature called High Speed Sync. This allows the flash of light to fire off during burst mode on your camera.
Narrower Apertures Work Best
To talk about aperture, we need to quickly chat about a common photography term, “depth of field.” Depth of field refers to how much of an image is in focus. When a depth of field is shallow, that tends to mean that just the subject is in focus and the rest of the image blurs away. When a depth of field is deep, both the subject, the foreground, and the background are in focus.
Depth of field is controlled by the aperture.
Aperture are the numbers on your camera that can range from f/1.2 to f/64. The smaller the number, the wider your aperture. The larger the number, the narrower your aperture (a bit counter intuitive, I know). The wider the aperture, the more light it lets in and the shallower the depth of field. The smaller the aperture, the less light it lets in and the deeper the depth of field.
Although a blurry background has become the trendy type of photograph, deep depths of field are best for explosion photography. That allows you to capture the majority of the details nicely in focus and express the true tremendous aspect of the experience. The sweet spot is about F/8.
Just remember that the narrower you make your aperture in order to create a deeper depth of field, the darker your photograph will be.
Pre-Focus on the Explosion Area
Now, because of the high speed nature of explosions, ensuring all of your settings are pre-set is key. One of these settings is having your focus locked on the explosion area ahead of time, to ensure you don’t miss focus in the optimal moment. You can do this by setting your focus points.
Focus points are little dots that tell the camera and its lens what to lock focus on. By default, your camera focus points will be set to Area Autofocus. This means that the camera will try and determine what you want to focus on, and this can lead to a lot of missed shots.
As such, you want to ideally switch your focus point to Single Point (or Spot in some brands) Focus- this means that the camera will focus on whatever area you tell it to! You will simply need to line up the little black square that appears in your viewfinder over the subject and area you want to focus on.
Types of Explosion Photographs (And How To Do Them)
The information above is a very generalized description of what you may need for capturing explosions. There are a lot of different types of photography expressed when one says “explosions”. The most common are fire, powder, balloon, and object booms!
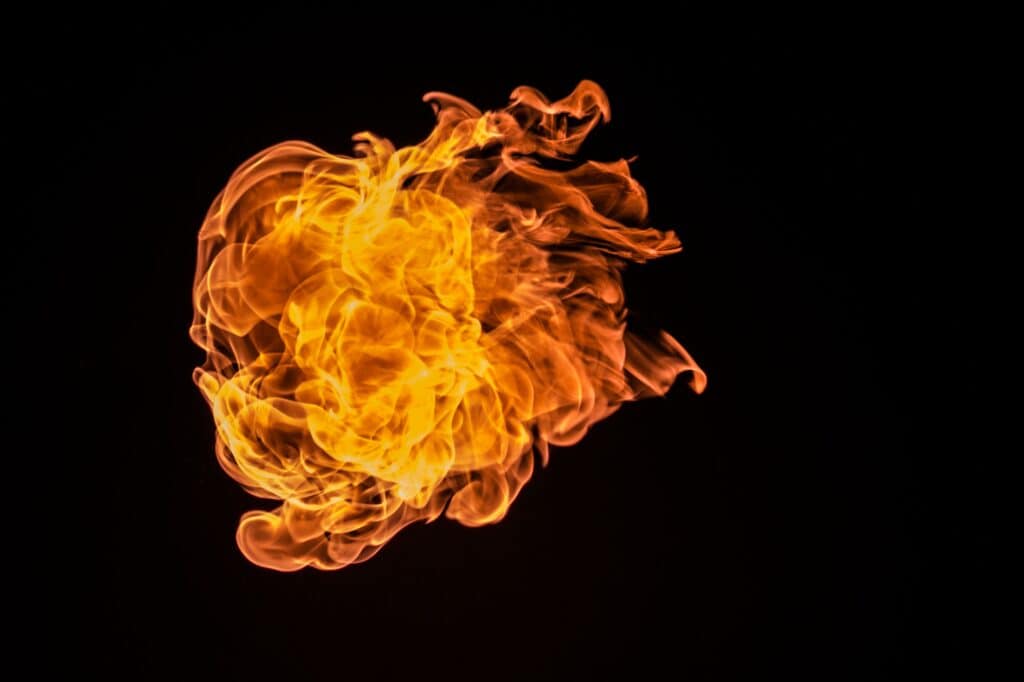
Fire Explosions
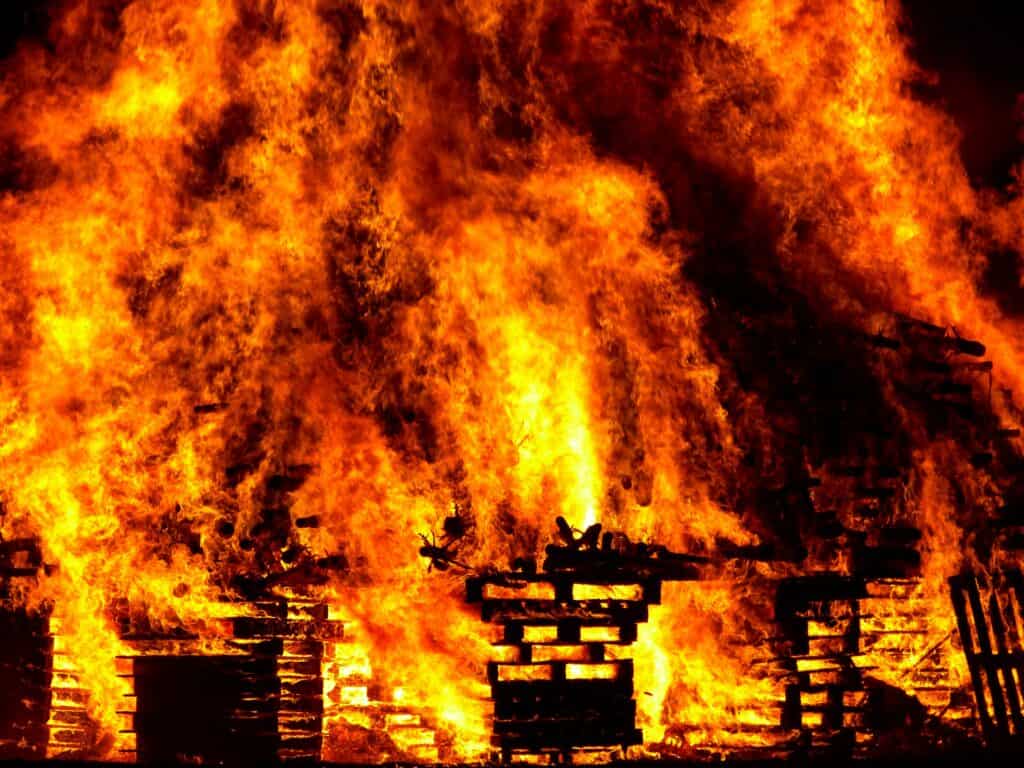
Fire explosions are the most commonly thought of when the topic comes up in conversation.
This is the most dangerous type of explosion photography and really should only be attempted or conducted with professionals around! Contacting a local stunt school or movie is a great spot to do such photography, or if you have access to local military bases practicing with weapons, that can also be an idea. In either case, always have a professional on site and do not attempt this yourself.
Working with fire works great with the settings needed for explosion photography, as the bright flames provide a great illumination for fast shutter speeds and narrower apertures. The ISO will tend to sit around the 100 – 400 range, no noise! Underexposing the flame is actually the best bet in capturing all of the details, as you can then use post processing software to bring the lightness back to it.
Powder Explosions
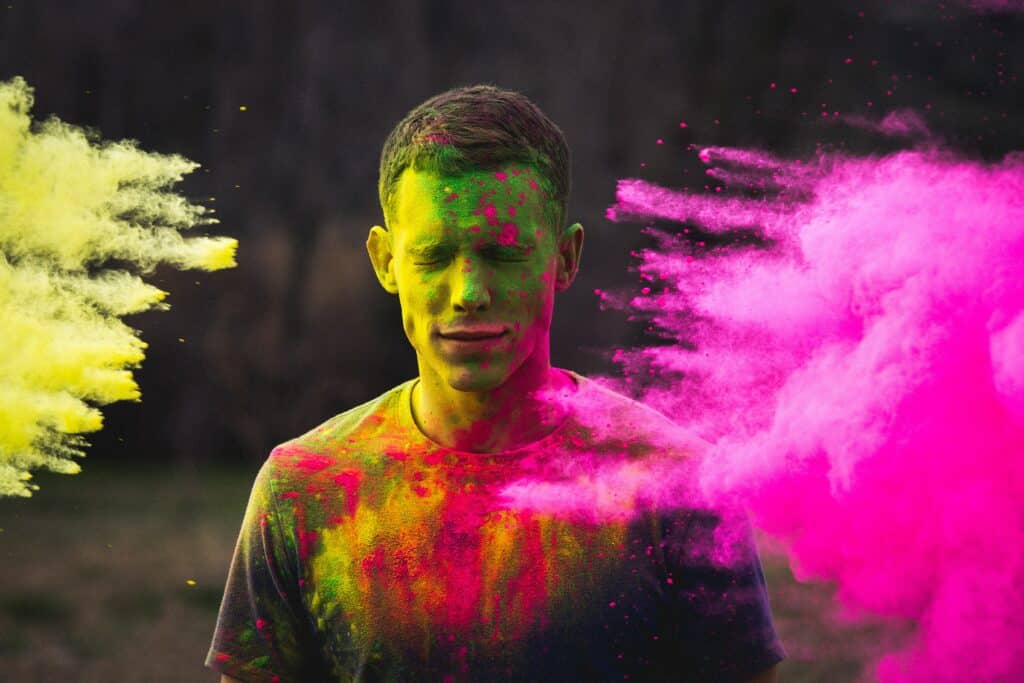
Another very popular type of explosion photography, using colored powder is a safe and fun way to create really eye catching photographs. Most commonly done with food dye and flour or powdered chalk, you don’t actually need the powder to explode to do this. The way that the colored powder moves in the air due to its lightness is actually what looks like the explosion!
These types of photographs are often done with the aid of assistance, someone takes a bucket or handful of powder and throws it at the subject. The way the powder travels in the air looks like it is exploding outward. Once the powder hits your subject and bounces off, this creates another amazing explosive look.
Much like the above suggestion, faster shutter speeds are the only real way to capture this fun movement.
Exploding Balloons

Popping balloons is an explosion in and of itself! A very popular type of photography, filling balloons with water or paint and then popping them on camera creates some really incredible images. Our human eye and mind cannot see the details in a balloon pop due to how fast it happens, so using a high speed camera brings to light an action we are otherwise unable to witness.
This is best done in a studio as you will likely need a tremendous amount of artificial light to even out the darker exposure due to shutter speed and aperture. You want to keep noise as minimal as you can to make sure the grain doesn’t impact the details of your photograph. Use a high speed sync flash and you should be good to go! A triangle arrangement works awesome for this set up, position one light above the subject and two lights behind it aiming towards the subject. That will illuminate every part of it.
Exploding Objects

Much like exploding balloons, exploding objects are done with the same concept in mind. Use something to puncture or break an object and capture the result on camera!
In conclusion, boredom can easily be quelled with attempting any of the above explosion shots. Give it a whirl with our guide and have fun (but remember to be safe!).